Hi there,
Thanks for stopping by! For all things apartment organization, design and DIY, check out my new site at lamourcheznous.com.
I would love to see you there!
Lauren

Hi there,
Thanks for stopping by! For all things apartment organization, design and DIY, check out my new site at lamourcheznous.com.
I would love to see you there!
Lauren
Hello my lovely readers,
If you have been following me for a little while, you know I’ve mentioned on and off the new site I’m working on. Here’s the quick back story:
Clearly, judging by the field I write in, I am a visual person. Even when creating the “design” (if you can call it that!) for this blog, I felt limited. It worked for a while, but soon I felt the pull for a more streamlined and unique design.
I checked out Etsy’s templates and designers, and noticed they either were a) designed for blogger (I could be wrong, but this platform seems more user-friendly design-wise than wordpress) or b) exorbitantly expensive.
I did my research on a few different sites and forums, and eventually, I landed on designing the site myself, and coding with the help of an awesome friend. (Thank you Adam!)
Yes, that’s right. I am learning how to CODE. Never thought I would ever get into it, but it’s surprisingly freeing. It takes ages to figure out how, but it’s rewarding to see my design ideas in action!
All that to say, this is absolutely a DIY. I’m sure to be tweaking and changing little bits and pieces, but I could go on forever doing that… I just need to at least get it out there! So here it is:
Pretty simple! Just drop the wordpress and you’ll hit my new site. If you follow me by email, I’m currently transferring you over to my new site (fingers crossed!). If you follow me via wordpress, you’ll need to update your reader. I get so excited each and every time I see a new follower, so let me tell you, I’m so happy to have you reading :).
I have a ton of new ideas and projects, and I can’t wait to share them with you all on the new L’amour chez nous!
Hope to see you there,
Lauren
So clearly you can tell that I love to DIY, but I only recently discovered how much I would like to DIY my own website! Unique web designs can be so expensive, so I’ve been on the hunt to learn as much as I can do it myself. It’s still a work in progress (this is QUITE the learning curve for me) but I’ve already discovered so much!
I thought I’d share the love and let you in on the three sites that have helped me the most.
![]()
1. Photo Editing: PicMonkey
Not only are web designs expensive, but so are the programs behind them. If you don’t want to shell out for a Photoshop program and would prefer something user-friendly, I would highly suggest Pic Monkey.
I often use their online platform to edit photos, add in text or banners, or even to create a logo. It’s very easy to use, and it’s surprisingly powerful. The only downside I find is that you need to keep the browser open to edit a photo. That means, if I’m working on a logo, I can only make changes with the browser open. Once I close it, I need to start fresh. Overall though, great program for basic editing needs!
2. Young House Love’s Blogging Tips Section
(This is their awesome book! If you’ve never heard of it, I’d highly recommend it.)
I find reading through experienced bloggers’ blog help sections incredibly helpful. It doesn’t necessarily have to be YHL, but they’re one of my favourites (and I’m clearly not alone, with all the comments they get on a daily basis!). They post on a wide variety of blog topics, from coding to how long a post actually takes to be published. I never realized how time consuming blogging truly was until I started my own…. Check out some of your favourite established blogs and see what helpful insight they might have to offer.
And the site that inspired this post…
3. Don’t Fear the Internet: Coding Basics

Unlike wordpress.com, wordpress.org offers the possibility to design to your heart’s content. I definitely wanted this option, as my current site leaves a lot to be desired, in my opinion. However, to get what you want, you need to learn to… CODE. Eek!
Armed with only a tiny bit of html knowledge I learned a few months ago, I was not prepared to take on designing a new website with my own coding. Thankfully, I have a friend helping me out, but I want to understand the behind the scenes elements of a website myself. This site offers a great foundation and is done all through video. Seeing a visual demonstration of what coding accomplishes helped me immeasurably. Now I know things like, the difference between html and css. (You may have an idea, but I honestly was clueless until this weekend.)
This site offers a very simple and easy to understand format. Unfortunately, they have a limited selection of videos… I guess the writers behind it got busy. If you don’t have any background in coding and want to learn, I would definitely recommend checking it out.
There you are! My top three blogging help sites. Be sure to check back Wednesday for my next home project!
Hello my lovely readers, and Happy Fourth of July to my American friends! Here is my round up of favourite spaces around the blogosphere this week.
1. I’m a sucker for architectural detail and loft ceilings so I was bound to fall in love with this one…

Wouldn’t you love to have an office this open and airy? She does a great job adding in functional organization too with the built in cabinet and desk.
2. 10 Bonus Benefits to Small Space Living:

I needed this post this week. I feel like our storage is bursting at the seams… There is only so much you can fit into 625 sq ft so a purge is very much in order! That being said, I whole-heartedly agree with some of these points… especially about having less to clean. I barely manage in our little space. How some you handle enormous five bedroom homes is beyond me! For you apartment dwellers like me, this might be worth a look.
3. This masculine black and white office is so lovely to look at. The crisp hits of black are so striking.

{source unknown}
4. Kate from Centsational Girl wrote an article on bold and bright accents this week.

It’s a great source of inspiration if you’ve been thinking about adding in some colour but are too scared to take the plunge..!
5. And of course, the last one to show you is this stunning living room by Emily Henderson:

Can I ever get enough of Emily Henderson? I would never think to use a dark blue carpet, but this one looks so rich and luxurious… The sharp geometric lines of the coffee table are great too. As much as her style is a bit too eclectic for me, she’s one of my all-time favourite designers.
Hope you have a wonderful sunny weekend and see you Monday!
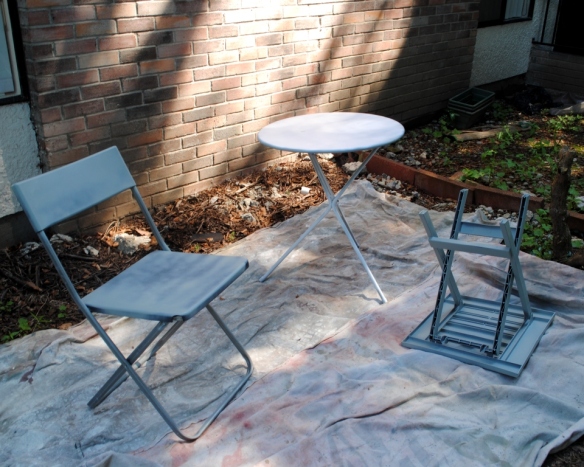
When we were looking for apartments, the only reason we wanted outdoor space was for our dog. When we moved it, my first thought was, yes, DIY space! And yes, DIY space it was… and puppy space it was… and that’s it. It was getting a bit embarrassing really. I was planning on doing the bare minimum to clean it up, but then I saw this:

One of my all-time favourite bloggers set up her latest monthly organizing challenge and I just had to participate!
But clearly, I had my work cut out for me.
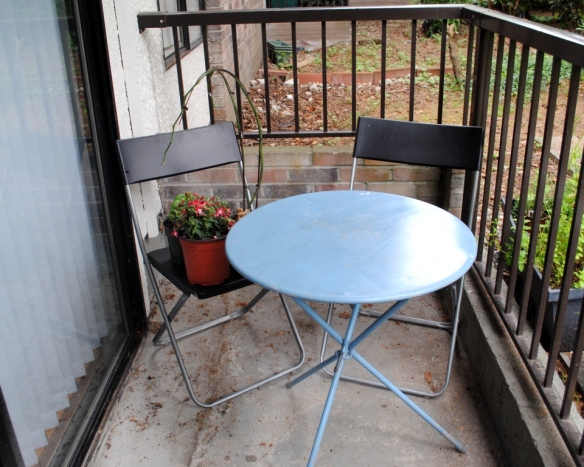
(And that’s not even the worst of it. When the patio’s completely finished, I’ll force myself to show you the full before picture…)
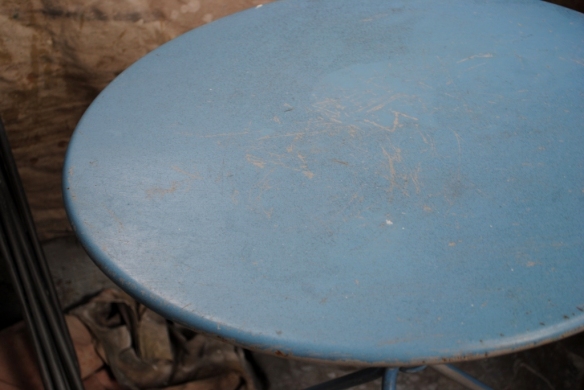
Those cheapo Ikea chairs were came with a basement apartment my friends and I had a few years ago (yes, those were literally our kitchen chairs for 6 months!) and the table… I literally picked up on the side of the road. You may think it looks somewhat reasonable based on the colour, but really, it was in rough shape.
I decided to try my hand at spray painting them all, plus a cheap little plastic side table we had out there too. Admittedly, I had only really sprayed various frames up until this point… I didn’t quite realize how long (and how many cans) four pieces of furniture would take!
First, I sprayed them all with a primer (Rust-oleum for metal). The guy at Home Depot recommended I choose the lightest grey colour they had since they were out of white, so I ended up using the one meant for metal, not for metal and plastic.
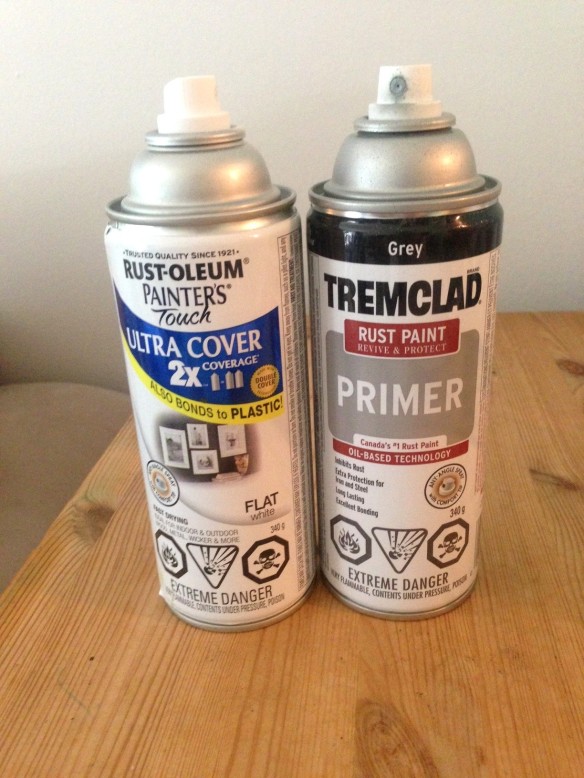
First I cleaned the heck out of them with soap and water and left them to dry. Then I sprayed a light-ish coat of primer (let’s be honest, I clearly had drips on the chair backs).

And then… had to wait a week because it wouldn’t stop raining.
A week later I tackled the white:
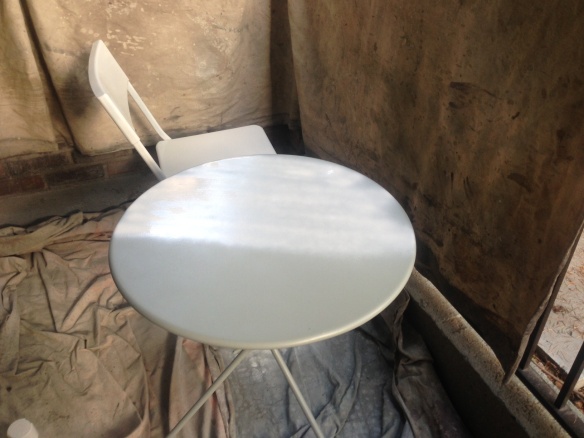
It took me two or three coats of white to get them all covered. I would recommend going with a white primer instead of grey if you have the option!
As much as it was a longer process than I had expected, I’m really happy with how they turned out. I didn’t have high expectations for the Ikea chairs, but actually, they’re so much prettier!

A fresh and crisp coat of white and you would never know they are a bunch of mismatched hand-me-down plastic furniture!
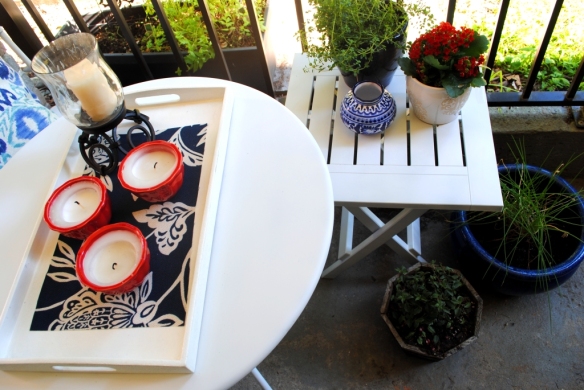
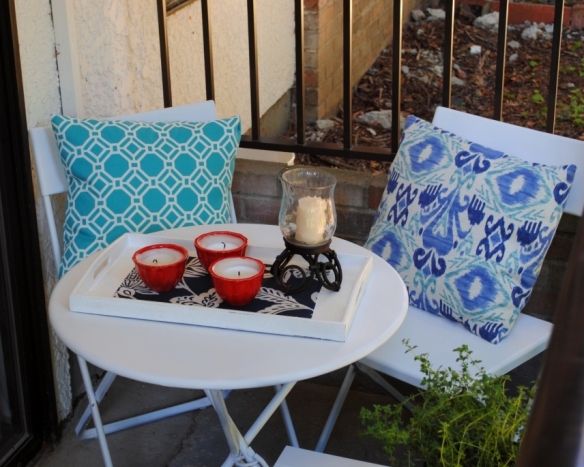
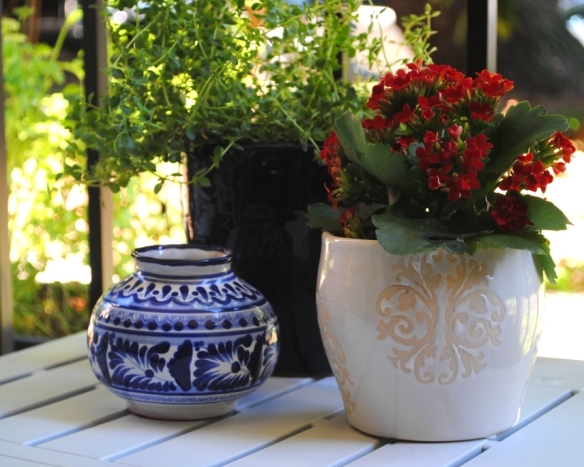
I opted to go for little hits of nautical colours. The dark blue was easy since I just brought a few elements from my living room outside, like the pillows.
I would love to have separate pillows for outside too, but storage is at a PREMIUM in this place. If I did that, I’d have to forgo something else and have to worry about them in the winter. Because I used outdoor fabric, I can use them in both spaces, and keep them inside in the winter months.
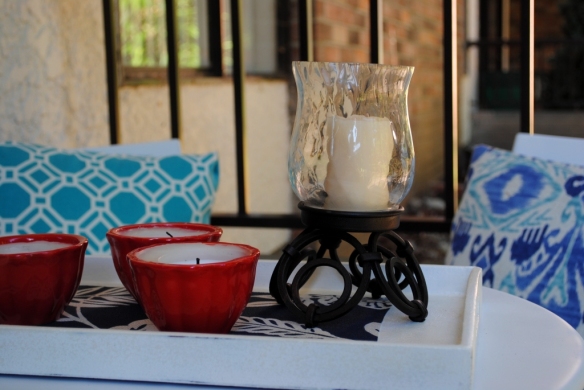
I also branched out and went for little pops of red. I don’t think I’ve ever done that before! I think they work really nicely against the dark blue.

Plus, these are citronella candles, so Shaun and I can enjoy our little outdoor space without the bugs. Win-win.

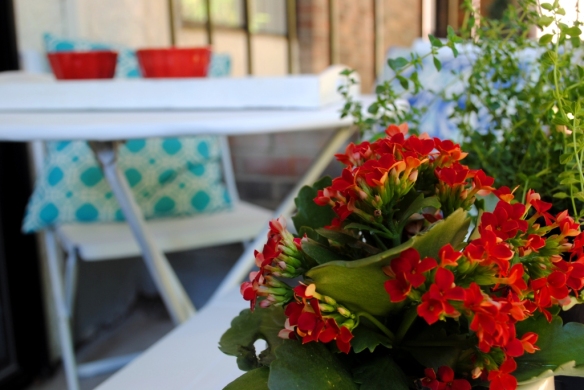
I added a spare piece of navy fabric I had lying around to add some colour to the table. The tray is a great space saver because I can simply take it off when we want to have dinner, or if we want to bbq on the table. (Yes, even the bbq. I need multi-functional furniture in a 4 ft wide space! We’ll just put a piece of wood over top of the table to protect it when we want to start up our little grill.)

Costs:
1 primer and 2 cans of spray paint at $7 each, so $21 total. (Though I went through another half a bottle of white I had hanging around too…)
Citronella candles: $10
New plants: $7 (which is ridiculous because I’m pretty sure I already managed to kill the one I bought last week.)
Table and chairs: free
Everything else I had on hand at home!
Total mini-makeover cost: $38.
Again, here’s what I started with:
And here’s how it looks now:
Not bad eh? The sunshine in the second photo helps. My patio’s only half-way done (I still need to tackle the other side) but I feel like I’ve made progress!
Any projects you have to tackle for the summer? Or would you rather spend your long warm days lounging or going away? I found it funny when I realized I’d rather spend my long weekend sweating in work boots and painting clothes than going on a little mini-trip!
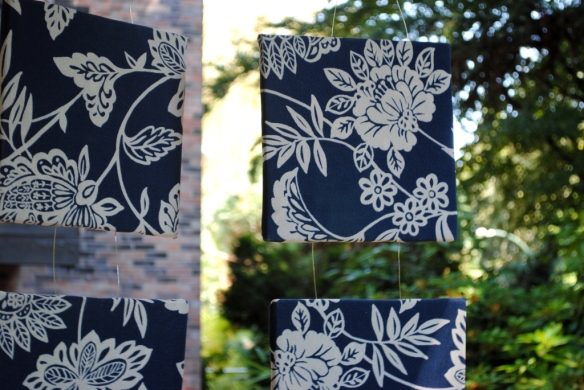
I’ve recently become a little obsessed over outdoor fabric. I seem to find much prettier and modern prints at my local fabric store in outdoor prints, but I never realized how much more versatile the material is. Not only is it pretty for pillows, but it also keeps clean as place mats (since it’s stain repellent) and can be used as art on a patio!
In my pre-blogging days, I still DIYed a project or two, like these:

I used them as cheap “art canvases” in our hallway.
To make them, I cut out four pieces of plywood, each 1’x1′. I chose a pretty piece of fabric (you’ll notice I’ve done this twice already!) and, used a staple gun to attach each piece securely into place.
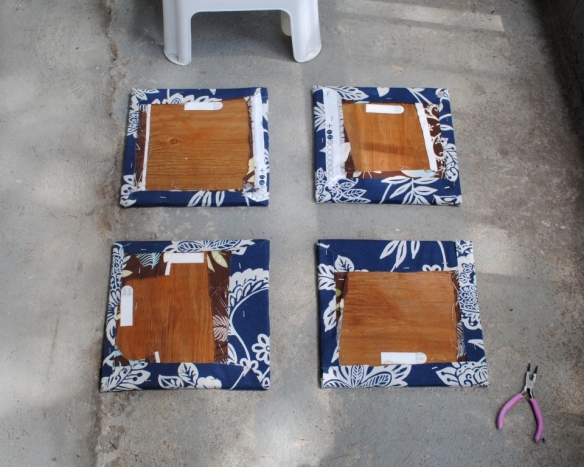
Originally I had hung them with velcro command strips. I’ve had them cluttering up the our bedroom floor for a while, and I had yet to find a place for them in this apartment… Until I realized they would be perfect with the nautical colours I’m using for our patio!
The must-have before shot:
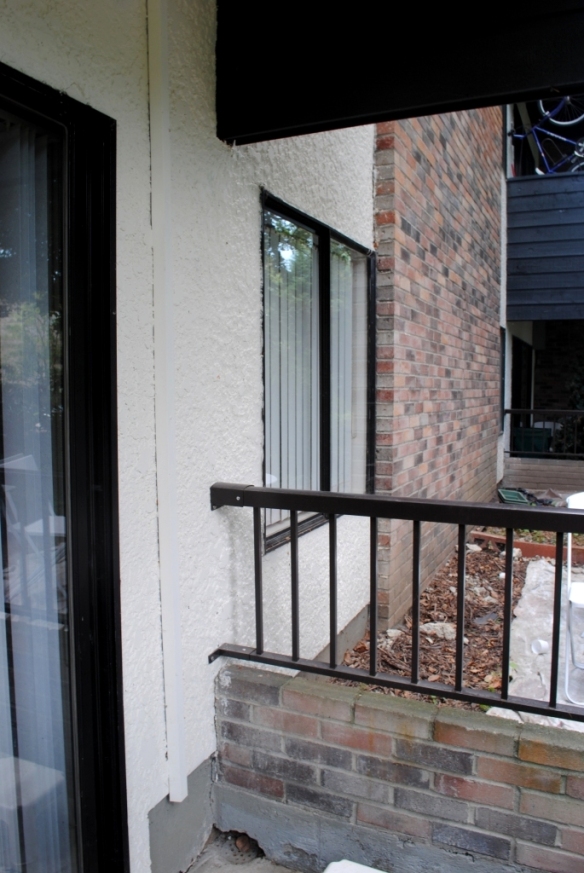
The rental patio… Pretty bland, must like the rest of our place. I wanted to add some privacy to either side. The view from this angle isn’t too much of an eyesore (more on the other side later), so I just needed something small. My canvases fit the bill!
To put them up, I used some extra wire I had left over from a Christmas project and again, my trusty staple gun.
Total Material Needed: a staple gun, wire, pliers to cut the wire, a level, a tape measure, hammer and nail, outdoor fabric and precut plywood.
I started off by attaching two canvases together with two pieces of wire.
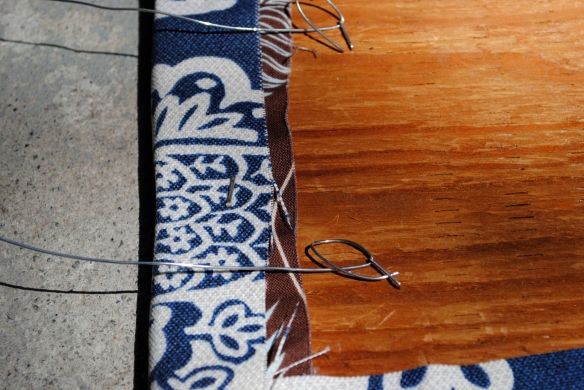
With the weight of the wire, the staples didn’t push down completely flush to the plywood. To keep them in place, I just bent the wire back. Holds easily :)
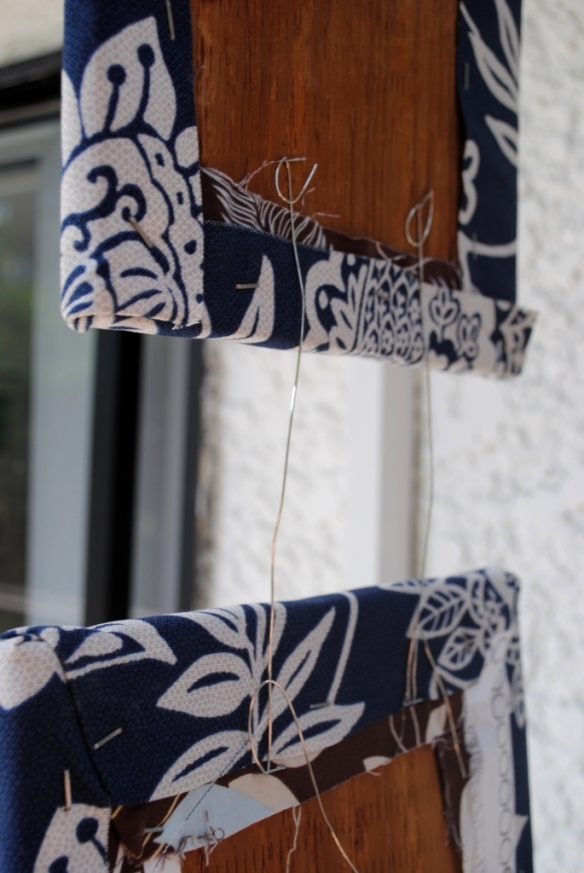
I followed the same process on the bottom frame. To keep it level, I recommend stapling the same distance apart and of course, keeping the wire the same length. Keep the bottom staples entirely level to avoid falling crooked to one side. That being said, don’t worry about it being perfect. Because the wire is only bent in place, not fastened, it’s easy to adjust once you’re done.
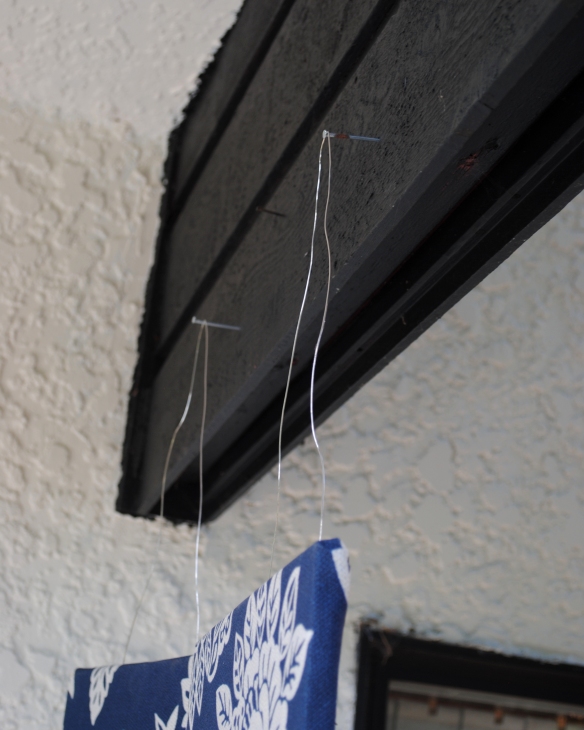
On the top end, I attached one long piece of wire, and hung it on a nail above our balcony. Simple.
I had to tweak them a bit, but it was such an easy project. I’m surprised at how happy I am with the result!
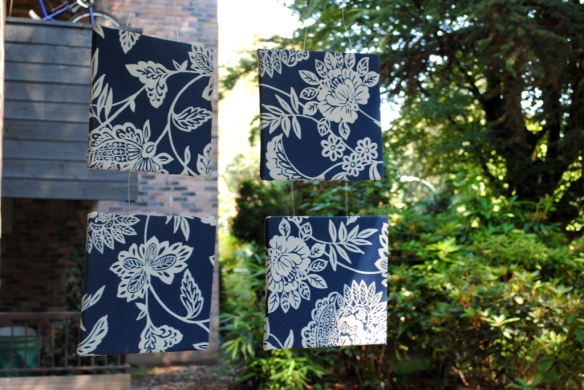

Since I already had the canvases, it only took about an hour to put together. My patio is starting to take shape… Here it was this morning:
And this afternoon with my newly hung floating art:

There’s a little sneak peak of the patio furniture I just finished too… Pretty excited to show you all! I would today, but the paint needs to fully dry before I can style it.
Total costs for this project:
Free!
I already had everything on hand. It’s still super budget-friendly though: less than two yards of fabric and a bit of wire and plywood. Cheap cheap cheap.
Check back Wednesday to see my new patio furniture. Pretty exciting what a can a few cans of spray paint can do!
The end of June… Wow! I finally see what all the teachers and mums in my life are talking about. School BBQ’s, Father’s Day picnics, end of year parties, graduations, special dinners… Such a busy month. To all of you teachers and mothers reading, happy summer!
This week one of the bloggers I follow, Kirsten, from 6th Street Design School, posted a “Parade of Homes”. So many gorgeous photos that I just had to share a few. The crisp black and white styles were my favourites!
1. The first one that stood out to me was this kitchen.

I love the crisp and modern lines of the white cabinets, industrial stools and chrome lamp against the warm wood floors. One day…
2. This clean and modern office:

The fun pops of yellow are great against the monochromatic black and white scheme. It inspires me to see what patterns and lines work well with chevron too.
3. Continuing on with the black and white theme of the week…

This one is from a fellow Canadian, so I’m of course intrigued. I love her styling here, especially because this is her actual home, not just a room styled to be perfect like the ones above.
4. I clearly have to throw a DIY in. This is a simple trash bin spray painted and turned into a side table. Clever, and you would never know.

5. Not only is it the beginning of summer, but it’s also Canada Day Long Weekend up here in Vancouver. This shot reminds me of a quiet, comfy cabin nestled in the mountains here in BC…

It inspires me to go outside and enjoy warm summer evenings. (Once our rain stops anyhow.) Hope you have a lovely and sunny weekend and to all you Canadians, Happy Canada Day.
Prof de français à Churchill
The Ultimate Dog Obsessed Blog
My Adventures In The World & In The Kitchen
Learning to love my rented space
Learning to love my rented space
Learning to love my rented space
Learning to love my rented space
Learning to love my rented space
Learning to love my rented space
Learning to love my rented space
Learning to love my rented space
Learning to love my rented space
Learning to love my rented space
Learning to love my rented space
